Gear stick Adjustment
Click any image to enlarge
I needed to remove and adjust the gear stick for a
number of reasons:
1. The shift pattern was not right. I was always
finding 2nd gear difficult.
2. The gear stick movement was sloppy.
3. The
pressure spring was constantly rattling.
4. I have a new Nickel plated
gear stick!!!!!!
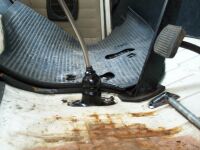
Firstly, remove the rubber matting to expose the
gear stick cover. Remove the 2 M8 bolts (13mm spanner) and lift the gear stick
assembly away. Examine the gear lever ball and indent pin for wear. The indent
pin on my gear stick had worn at both ends (see picture) and so was replaced for
a good used example. The socket that the gear stick fits into was cleaned and
re-greased.
The
new gear stick was built up by first placing the conical spring (small end
pointing up) over the end of the stick. Then the indent pin and spring are
placed in the recess in the gear stick. Grease the spring to damp any vibrations.
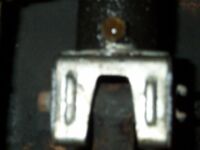
Locate the shifter plate (check for wear) over the aperture and carefully place
the gear stick end into the socket. The indent pin fits into a slot in the
socket. The gear stick is put into the socket by angling the stick backwards to
depress the indent pin so that the ball will fit into the socket. It is all a
little bit fiddly, but after a couple of goes you will soon see how it goes
together. Again, another job where you need 2 pairs of hands!!
Once the
gear stick is positioned into the socket, keeping a downwards pressure, lower the
cover (grease the inside of the cover) and gaiter over the end of the gear stick
and re-fit the 2 bolts hand tight only.
 Now depress the clutch and engage
second gear. Move the shifter plate until the gear stick is pointing vertical
(cranked section pointing roughly 30 degrees backwards). I could not get the
gear stick to point vertically. The best I could achieve with the movement
available was about 80 degrees. Once this has been completed, move the shifter
plate towards the left until it just touches the gear stick. The shifter plate
guides the gear stick and also prevents reverse gear being selected when trying
to find second gear. Tighten the 2 bolts and try the gear stick for movement. You
should be able to locate all the gears and the movement between 2nd and 1st gear
should be in a straight line. If not, slacken the 2 bolts and re-position the
shifter plate until the desired movement is achieved. The selector plate from
mid 1971 had 2 indents that the gear stick cover sat into to help with
adjustment. The modified parts can be fitted to an earlier model.
Now depress the clutch and engage
second gear. Move the shifter plate until the gear stick is pointing vertical
(cranked section pointing roughly 30 degrees backwards). I could not get the
gear stick to point vertically. The best I could achieve with the movement
available was about 80 degrees. Once this has been completed, move the shifter
plate towards the left until it just touches the gear stick. The shifter plate
guides the gear stick and also prevents reverse gear being selected when trying
to find second gear. Tighten the 2 bolts and try the gear stick for movement. You
should be able to locate all the gears and the movement between 2nd and 1st gear
should be in a straight line. If not, slacken the 2 bolts and re-position the
shifter plate until the desired movement is achieved. The selector plate from
mid 1971 had 2 indents that the gear stick cover sat into to help with
adjustment. The modified parts can be fitted to an earlier model.
 I had 2-3 goes at re-positioning the
selector plate before I was happy with the movement. On completion the movement
was much slicker which must have been down to the wear in the indent pin but
with the large distance between the gear stick and the gearbox, the shift is
never going to be perfect. With everything re-fitted the Haynes manual states
that the maximum sideways movement of the gear stick when in 2nd gear is 35mm and
70mm when in neutral. If this movement still cannot be achieved, check the
square gearbox coupling under the van between the gear linkage and the gearbox
input shaft. Wear here will magnify the movement at the gearstick. The coupling
costs about £10 and is located by a square headed (7mm) screw. I knew that this
was OK on my van as I changed it last year!!
I had 2-3 goes at re-positioning the
selector plate before I was happy with the movement. On completion the movement
was much slicker which must have been down to the wear in the indent pin but
with the large distance between the gear stick and the gearbox, the shift is
never going to be perfect. With everything re-fitted the Haynes manual states
that the maximum sideways movement of the gear stick when in 2nd gear is 35mm and
70mm when in neutral. If this movement still cannot be achieved, check the
square gearbox coupling under the van between the gear linkage and the gearbox
input shaft. Wear here will magnify the movement at the gearstick. The coupling
costs about £10 and is located by a square headed (7mm) screw. I knew that this
was OK on my van as I changed it last year!!
Home
)
)
)
)
)
) Now depress the clutch and engage
second gear. Move the shifter plate until the gear stick is pointing vertical
(cranked section pointing roughly 30 degrees backwards). I could not get the
gear stick to point vertically. The best I could achieve with the movement
available was about 80 degrees. Once this has been completed, move the shifter
plate towards the left until it just touches the gear stick. The shifter plate
guides the gear stick and also prevents reverse gear being selected when trying
to find second gear. Tighten the 2 bolts and try the gear stick for movement. You
should be able to locate all the gears and the movement between 2nd and 1st gear
should be in a straight line. If not, slacken the 2 bolts and re-position the
shifter plate until the desired movement is achieved. The selector plate from
mid 1971 had 2 indents that the gear stick cover sat into to help with
adjustment. The modified parts can be fitted to an earlier model.
Now depress the clutch and engage
second gear. Move the shifter plate until the gear stick is pointing vertical
(cranked section pointing roughly 30 degrees backwards). I could not get the
gear stick to point vertically. The best I could achieve with the movement
available was about 80 degrees. Once this has been completed, move the shifter
plate towards the left until it just touches the gear stick. The shifter plate
guides the gear stick and also prevents reverse gear being selected when trying
to find second gear. Tighten the 2 bolts and try the gear stick for movement. You
should be able to locate all the gears and the movement between 2nd and 1st gear
should be in a straight line. If not, slacken the 2 bolts and re-position the
shifter plate until the desired movement is achieved. The selector plate from
mid 1971 had 2 indents that the gear stick cover sat into to help with
adjustment. The modified parts can be fitted to an earlier model.) I had 2-3 goes at re-positioning the
selector plate before I was happy with the movement. On completion the movement
was much slicker which must have been down to the wear in the indent pin but
with the large distance between the gear stick and the gearbox, the shift is
never going to be perfect. With everything re-fitted the Haynes manual states
that the maximum sideways movement of the gear stick when in 2nd gear is 35mm and
70mm when in neutral. If this movement still cannot be achieved, check the
square gearbox coupling under the van between the gear linkage and the gearbox
input shaft. Wear here will magnify the movement at the gearstick. The coupling
costs about £10 and is located by a square headed (7mm) screw. I knew that this
was OK on my van as I changed it last year!!
I had 2-3 goes at re-positioning the
selector plate before I was happy with the movement. On completion the movement
was much slicker which must have been down to the wear in the indent pin but
with the large distance between the gear stick and the gearbox, the shift is
never going to be perfect. With everything re-fitted the Haynes manual states
that the maximum sideways movement of the gear stick when in 2nd gear is 35mm and
70mm when in neutral. If this movement still cannot be achieved, check the
square gearbox coupling under the van between the gear linkage and the gearbox
input shaft. Wear here will magnify the movement at the gearstick. The coupling
costs about £10 and is located by a square headed (7mm) screw. I knew that this
was OK on my van as I changed it last year!!