Bodywork and Chassis areas to check when buying a Bay-Window (68-79) Volkswagen Van!
Click any image to enlarge
This is the easiest area to describe as there is no part of the chassis or bodywork that does not or will not suffer
from rust. The previous owner (original owner) of our 1970 model noted rust on the bodywork
after only 4 years from new! This van is now 32 years old, so you can imagine what has been repaired or needs work. Even the newest
Bay-Window van is a minimum of 22 years old and came from the factory with the minimum of rust prevention. Indeed, as a high
proportion of vans were originally delivery vans, they were often used and abused as a work horse.
Many people buy "cheap" vans around the £1000-£2000 mark with the idea of doing a rolling restoration. Unless you have plenty of time, money, space and are
very proficient with a welder then think again. Many people take years to restore a classic car never mind a van that has twice the
surface area of a car! A standard garage is not high or wide enough to store a Type 2 so consider what you can really complete before
buying a van. The time and money involved in restoring a van will never be returned when the time comes to sell, even though Type 2's
are always increasing in value. The cost of getting a professional restoration company involved is also high. The price can vary
greatly from £5000-£15000 for a show quality restoration. You are much better to spend you money on the initial purchase and buy
the best van available. Mechanical work is generally easier and cheaper to complete than body repairs.
The main areas to check for corrosion when buying a Bay-Window are as follows:
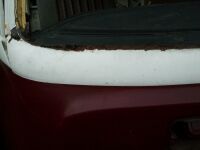 Front screen surround.
The front panel can rust around the windscreen rubber seal, which lets water
into the cab area, rotting the floor. The only remedy is to remove the screen and dash
and weld in new metal. Depending on how far the rust has ventured, a new front panel may be
the best solution. Front panels are available from Alan Schofield. 1973> front
panels cost under £60 as they are still being made in Brazil but have a round, raised section in the middle. If you mount the
spare wheel on the front of your van then you will not see this raised area but if you don't then the front panel may
have to be modified if you do not like the looks. The earlier front panels with the indicators mounted low, cost around £200 as they
are modified later panels.
Front screen surround.
The front panel can rust around the windscreen rubber seal, which lets water
into the cab area, rotting the floor. The only remedy is to remove the screen and dash
and weld in new metal. Depending on how far the rust has ventured, a new front panel may be
the best solution. Front panels are available from Alan Schofield. 1973> front
panels cost under £60 as they are still being made in Brazil but have a round, raised section in the middle. If you mount the
spare wheel on the front of your van then you will not see this raised area but if you don't then the front panel may
have to be modified if you do not like the looks. The earlier front panels with the indicators mounted low, cost around £200 as they
are modified later panels.
 |
 |
Seat belt mounting. The area where the seat belt anchors to is an area that commonly rusts as the lip that forms the outer
front wheel arch traps water. Can be difficult to repair if the rust has reached the b-post plus being the seat belt anchorage point, this
is a safety critical area so the fit and quality of any repairs must be to a very high standard.
 |
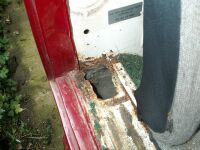
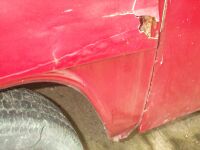
Front Wheel arch. Time consuming repair again as the rust is usually never confined to the arch itself but also to the cab
floor and the front a-post and the rear b-post. If the b- post has rusted near the back of the arch, then it is usual that the bulkhead
behind the seats will also have rusted. Early vans had the cab step formed into the bumper and the bumper mounts in this area, which again can cause
problems. Common bodge is to use an outer wheel arch skin to disguise any rust. Look for a lip where you can see the old arch. Why fit outer
skins when genuine VW full arches only cost around £110 for a pair?
 |
 |
Doors. The doors were notorious for rusting even when the Bay-Window was still in production. Most doors will probably be full of filler,
covering rust. Check the door bottom as the door traps water when the seals become brittle and the water has to find a way out. Replacement doors from sunny California
cost around £120 complete or new bare doors cost around £200 each. You can add a further £50 to the cost to replace the infinite
amount of seals and channels in the door. Door skins and door bottom repair section are available. The sliding door survives no better
than the front doors. Second hand examples are becoming very rare (up to £200+) but again, repair sections are available
 |
Rear Arches. Basically the same as a 10 year old Vauxhall Cavalier - rusty. Look for bubbling around the outer edge for signs
of rust being hidden by filler. The panel is not to hard to replace but difficult to hide the repair as the side of a van is
very flat which highlights poor repairs. When replacing, the new arch needs to be welded in small areas at a time to reduce the risk
of distortion due to heat build-up during welding or surprisingly, when weld are being ground flat. Cost of a new arch is £21 from
Just Kampers
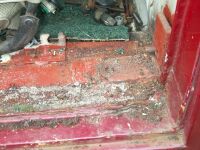
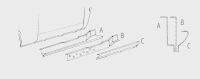 Sills. The sill look very simple but are in fact quite complex. If the outer sill is rotten then a lot of work is around the corner.
Even though the Type 2 has a strong chassis/ body, the sills are a major load bearing component of the body/ chassis. There are 3 sill sections
on a Type 2, inner, middle and outer so if the outer sill, which you can see is rotten, then the other 2 probably will be non-existent.
Many people fit outer sill to hide the amount of rust underneath. It is very difficult to determine if the inner sills are rotten
if a new outer has been fitted over the top. If you suspect the outer has been replaced recently, quiz the owner what work was done to
the inner sills. Bang the outer sill with you had and listen for rust falling. This will give you an indication of the amount of
corrosion.
Sills. The sill look very simple but are in fact quite complex. If the outer sill is rotten then a lot of work is around the corner.
Even though the Type 2 has a strong chassis/ body, the sills are a major load bearing component of the body/ chassis. There are 3 sill sections
on a Type 2, inner, middle and outer so if the outer sill, which you can see is rotten, then the other 2 probably will be non-existent.
Many people fit outer sill to hide the amount of rust underneath. It is very difficult to determine if the inner sills are rotten
if a new outer has been fitted over the top. If you suspect the outer has been replaced recently, quiz the owner what work was done to
the inner sills. Bang the outer sill with you had and listen for rust falling. This will give you an indication of the amount of
corrosion.
If the sills have to be replaced then the cost is considerable and need to be of a high standard. Any sill work will usually mean
work on adjacent panels such as the front b-post and the rear arch and inner floor. The side with the sliding door on is more
complex to repair and the sliding door runner is part of the sill assembly. Cost of a complete sill assembly for one side in parts alone is £65.
 |
 |
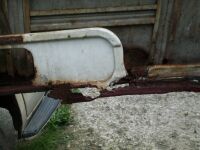
Rear Corners.One of the "traditional" areas of rust on a Type 2. Rust is caused by water being drawn down the engine intakes
on the rear corners. The water sits on the battery tray at the side of the engine and eventually rots its way out - through the rear
corner taking the battery tray with it. Most Type 2's
will have had rear corners by now. Replacing usually involves replacing the lower half plus the battery trays but if the rear
corners have been changed before then hope that who ever did the work did not use the full replacement panel. If they did, then extra
bodywork will be needed to join the new panel to good metal. If this is the case, then a complete rear corner which takes in part of the roof
and the air intakes may be the best long term solution. Genuine VW replacements cost £89 per corner from Just Kampers. Battery tray replacement is
best completed with the engine out which is further hassle and expense. The battery trays can be changed with the engine in place but access
is restricted.
 |
Chassis The body of the Type 2 is strong because it is basically a ladder chassis sandwiched between a unitary construction body.
The chassis is between the inner floor which is welded to it and belly pans below which give no structural strength and have been left off on a number of vehicles from
new by VW. In fact, many
people remove the belly pans to enable corrosion protection of the chassis. If the belly pans are in place it is very
difficult
to check the chassis for corrosion. Look for evidence of welding to the belly pans which may have been completed to hide
holes
which would allow viewing of the chassis. Thump the belly pans with your hand and listen for particles of rust dropping
down as described earlier. The floor can rust - usually because of water ingress through leaking roofs and through being used for camping in
wet weather. Replacement involves stripping out the interior and replacing the complete panel. Not easy as we found out! Floor Replacement
Areas of the chassis that can be checked are the chassis outriggers / jacking points, around the rear axle and ahead of
the front beam,
below the front panel. If you find rust near the rear torsion tubes then walk away - remedy involves serious work.
Home
)
)
)
)
)
)
)
) Sills. The sill look very simple but are in fact quite complex. If the outer sill is rotten then a lot of work is around the corner.
Even though the Type 2 has a strong chassis/ body, the sills are a major load bearing component of the body/ chassis. There are 3 sill sections
on a Type 2, inner, middle and outer so if the outer sill, which you can see is rotten, then the other 2 probably will be non-existent.
Many people fit outer sill to hide the amount of rust underneath. It is very difficult to determine if the inner sills are rotten
if a new outer has been fitted over the top. If you suspect the outer has been replaced recently, quiz the owner what work was done to
the inner sills. Bang the outer sill with you had and listen for rust falling. This will give you an indication of the amount of
corrosion.
Sills. The sill look very simple but are in fact quite complex. If the outer sill is rotten then a lot of work is around the corner.
Even though the Type 2 has a strong chassis/ body, the sills are a major load bearing component of the body/ chassis. There are 3 sill sections
on a Type 2, inner, middle and outer so if the outer sill, which you can see is rotten, then the other 2 probably will be non-existent.
Many people fit outer sill to hide the amount of rust underneath. It is very difficult to determine if the inner sills are rotten
if a new outer has been fitted over the top. If you suspect the outer has been replaced recently, quiz the owner what work was done to
the inner sills. Bang the outer sill with you had and listen for rust falling. This will give you an indication of the amount of
corrosion.)
)
)